
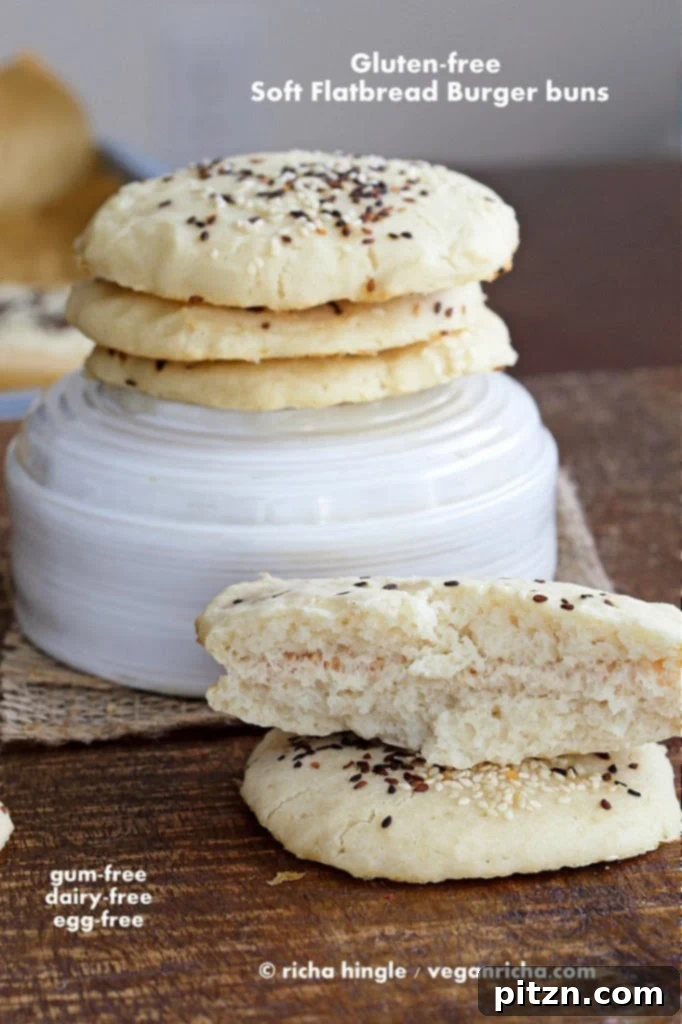
The Ultimate Guide to Super Fluffy, Soft, Gluten-Free & Vegan Burger Buns
Say goodbye to dry, crumbly, and lackluster gluten-free bread. It’s time to welcome an extraordinary addition to your kitchen: truly super fluffy, incredibly soft, perfectly moist, and wonderfully spongy white burger buns that are completely gluten-free and gum-free! Imagine biting into a burger cradled by a bun so airy and delightful, you’d never guess it’s suitable for those with dietary restrictions. Just look at that perfect, open cross-section – a clear sign of their irresistible lightness and exceptional texture. These aren’t just good for gluten-free; they’re simply good buns, period!
Why These Gluten-Free Vegan Burger Buns Are a Game-Changer
Our vegan gluten-free burger buns are a revelation. While they may have a slightly “flatbread” aesthetic compared to some highly processed, store-bought buns, their performance and flavor are anything but standard. The most important thing to know is: they are definitively *not* dry. Instead, they offer an unparalleled sponginess and moisture that will elevate any burger or sandwich you create. This recipe consistently passes the ultimate test – the one where even those accustomed to traditional bread exclaim, “I can’t believe this is gluten-free!”
The magic behind their texture lies in a carefully balanced blend of white rice flour, brown rice flour, various starches, and a touch of wholesome oat flour. Crucially, non-dairy yogurt plays a starring role in imparting a rich, moist crumb. Beyond the ingredients, a unique baking technique ensures perfection: baking the buns covered with parchment paper. This clever trick helps capture steam during the baking process, preventing premature drying and locking in moisture, resulting in buns that are incredibly soft and pliable.
Customizing Your Flour Blend for Optimal Results
We understand the desire for flexibility in baking, especially with gluten-free ingredients. You have the option to substitute up to half of the recommended grain flour with other flours you might prefer or have on hand. However, for the very best results, particularly when aiming for that signature soft, light, and airy texture, we strongly advise keeping a substantial portion of both white rice flour and oat flour in your mixture. These specific flours contribute uniquely to the bun’s structure and mouthfeel, making them essential for achieving the desired outcome. Experimenting is encouraged, but these base flours provide the foundation for success.
The Secret to Moisture: Non-Dairy Yogurt (and Alternatives!)
The inclusion of non-dairy yogurt in this recipe is more than just an ingredient choice; it’s a critical component for achieving the incredible moist and tender texture that defines these buns. We highly recommend incorporating it for its unique contribution. If non-dairy yogurt is not readily available, or if you simply wish to explore alternatives, you can achieve similar excellent results by using full-fat coconut milk. Its creamy richness provides similar moisture and richness. Another fantastic option is mashed avocado, which not only adds healthy fats but also contributes to the bun’s moistness and provides a subtle, earthy flavor. The versatility of this dough doesn’t stop at burger buns – feel free to shape it into larger, rustic flatbreads or even traditional Naan-style breads for a delightful culinary twist!
Why wait? Dive into your kitchen today and make a batch of these extraordinary gluten-free vegan burger buns. Your taste buds (and your burgers!) will thank you!
Pictured above, you can see these fantastic buns playing host to a mouth-watering burger, generously topped with our irresistible sloppy Sweet and Sour Lentils recipe. These versatile homemade buns are truly the perfect canvas for any filling. Whether you’re crafting a classic veggie burger, a savory mushroom patty, or any other Burger patty, these buns will hold up beautifully and enhance every bite.
Explore More Gluten-Free & Vegan Bread Recipes
If you’ve fallen in love with gluten-free and vegan baking, expand your repertoire with these other incredible bread recipes from our collection, each offering unique flavors and textures:
- Spicy Jalapeno Pepper JackBiscuits
- Sweet Strawberry OatSandwichLoaf
- Delicious GFNaanFlatbread
- Hearty Lentil Mung BeanTortillas
- Innovative Faux Sourdough Loaf
- Rustic Focaccia StylePizza Crust
- Light and CrispyThin TeffPizza Crust
For those who can enjoy gluten, you can find our traditional burger buns recipe here.
Step-by-Step Guide to Baking Perfect Gluten-Free Vegan Burger Buns
Crafting these perfect, fluffy buns is a surprisingly straightforward process, even if you’re new to gluten-free baking. Follow these detailed instructions meticulously to ensure a delicious and satisfying outcome every time.
Step 1: Preparing and Mixing the Dry Ingredients
In a large mixing bowl, combine all of your dry ingredients: the white rice flour, brown rice flour, oat flour, tapioca starch, potato starch, baking powder, and salt. It is absolutely crucial to whisk these ingredients together very thoroughly. In gluten-free baking, where there’s no gluten network to distribute ingredients, ensuring an even dispersion of flours and leavening agents is paramount. This step prevents pockets of unmixed ingredients and contributes significantly to the consistent texture and rise of your final buns.
Step 2: Activating the Yeast
In a separate, smaller bowl, combine 1/4 cup of warm water (ensure it’s between 105-115°F or 40-46°C, not too hot to kill the yeast, nor too cold to hinder activation), the raw sugar (or maple syrup), and the active dry yeast. Give it a gentle stir and then let this mixture rest undisturbed for 5 to 10 minutes. You’ll know your yeast is alive and well when it forms a frothy, bubbly layer on the surface. This frothing indicates that the yeast is active and ready to properly leaven your buns, contributing to their desired airy and soft texture.
Step 3: Combining Wet and Dry Ingredients to Form the Batter
Once your yeast mixture is beautifully frothy, pour it into the bowl containing your whisked dry ingredients. Next, add the extra virgin olive oil, the non-dairy yogurt, and the remaining 1/2 cup of warm water. Mix all these components together thoroughly until you achieve a thick, smooth batter. It’s important to note that, unlike traditional bread dough, this gluten-free mixture will resemble a thick cake batter rather than a kneadable dough. Ensure there are no dry pockets and that all ingredients are fully incorporated for an even consistency.
Step 4: Shaping the Buns
Line a baking sheet with parchment paper. Using a 1/4 to 1/3 cup measuring cup or a large serving spoon, drop dollops of the thick batter onto the prepared parchment sheet. Make sure to leave a few inches of space between each dollop to allow for expansion during baking. To prevent the sticky batter from adhering to your hands and to facilitate smooth shaping, lightly wet your hands with water or a little oil. Gently flatten and shape each dollop into a uniform round, approximately 3.5 inches in diameter and about 1/2 inch thick. This initial shaping is key for creating evenly baked and aesthetically pleasing buns.
Step 5: The Crucial Steam-Assisted Baking Technique
Once your buns are shaped, you can lightly sprinkle sesame seeds over the top of each for that classic burger bun look and a delightful nutty crunch. Here’s the most critical step for achieving ultimate softness: before placing them in the oven, spray a fine, even mist of water over the tops of the shaped buns. Then, gently lay another sheet of parchment paper directly on top of the buns. This top layer of parchment should sit lightly, effectively creating a miniature steaming environment for each bun. This ingenious technique traps moisture, preventing the buns from drying out and ensuring they develop an incredibly soft, spongy, and moist texture during baking. Let the shaped buns sit in a warm place for an additional 10 minutes after this step.
Step 6: Baking and Cooling for Perfection
Preheat your oven to a hot 450 degrees F (232 degrees C). With your oven ready, bake the buns for approximately 11-12 minutes. As soon as they are done, carefully remove the baking sheet from the oven and immediately lift off the top parchment paper. Allow the buns to cool slightly on the baking sheet for about 5 minutes before you gently remove them from the parchment. They will be quite delicate when hot, but they will firm up beautifully as they cool. While tempting to devour immediately, these buns truly develop their full, wonderful texture once they’ve had a moment to cool.
Recipe: Fluffy White Gluten-Free Vegan Burger Buns
Ready to create your own batch of these incredible fluffy, white, and perfectly textured burger buns? Here’s the complete recipe to guide you to homemade perfection!
Allergen Information: This recipe is meticulously crafted to be free of Dairy, Egg, Corn, Soy, Gluten, and Nuts, making it an excellent and safe choice for a wide array of dietary needs and common allergies.
Yields: 8 3.5-inch Buns
Ingredients:
- 1/2 cup white rice flour
- 1/4 cup brown rice flour
- 1/4 cup Oat flour (ensure it’s certified gluten-free, or substitute with amaranth, millet, or sorghum flour)
- 1/4 cup tapioca starch
- 1/4 cup potato starch
- 3/4 tsp baking powder
- 1/2 tsp salt
- 1/4 cup warm water (for yeast activation)
- 2 tsp active dry yeast
- 1 tsp raw sugar or maple syrup (essential for activating the yeast)
- 1 Tbsp extra virgin olive oil
- 1/4 cup non-dairy yogurt (coconut milk yogurt is highly recommended for optimal moisture; full-fat coconut milk or mashed avocado can be used as alternatives)
- 1/2 cup warm water (for the bun batter)
- Sesame seeds for sprinkling (optional, for classic burger bun appearance)
Method:
- In a large mixing bowl, thoroughly whisk together all the dry ingredients: white rice flour, brown rice flour, oat flour, tapioca starch, potato starch, baking powder, and salt. Mix very well to ensure even distribution.
- In a separate small bowl, combine 1/4 cup warm water (105-115°F/40-46°C), 1 tsp sugar (or maple syrup), and active dry yeast. Stir gently and let this mixture sit for 5 to 10 minutes until it becomes visibly frothy and bubbly. This confirms your yeast is active.
- Add the frothy yeast mixture to the dry ingredients. Pour in the extra virgin olive oil, non-dairy yogurt, and the remaining 1/2 cup warm water. Mix everything vigorously with a spoon or spatula until a thick, smooth batter forms. The consistency will be closer to a thick pancake batter than a kneadable dough.
- Preheat your oven to 450 degrees F (232 degrees C). While the oven heats up, let the bun batter rest near the warm oven for approximately 10 minutes. This allows the yeast to begin its leavening action.
- Line a baking sheet with parchment paper. Gently stir the rested batter once more. Using a 1/4 to 1/3 cup measuring cup or a large spoon, drop dollops of the batter onto the parchment-lined sheet, ensuring adequate spacing between each for expansion.
- To prevent sticking, lightly wet your hands with water or a little oil. Carefully flatten and shape each dollop into a round, approximately 3.5 inches in diameter and about 1/2 inch thick. If desired, sprinkle sesame seeds on top of each shaped bun.
- Lightly spray a fine mist of water over the tops of the shaped buns. Then, gently place another sheet of parchment paper directly on top of the buns. This top parchment should rest lightly, creating a steam pocket during baking, which is vital for achieving soft, moist buns. Let the shaped buns sit in a warm place for an additional 10 minutes.
- Bake for 11-12 minutes.
- Once baked, immediately remove the baking sheet from the oven and gently lift off the top parchment paper. Allow the buns to cool on the baking sheet for 5 minutes before carefully transferring them from the parchment paper. They will be delicate when hot but will firm up as they cool.
Tips for Perfect Gluten-Free Vegan Burger Buns Every Time
Essential Baking Tips:
- Measure Accurately: Precision is paramount in gluten-free baking. For the best results, use a kitchen scale to measure flours by weight if possible. If using measuring cups, spoon the flour into the cup and level it off without compacting.
- Optimal Water Temperature: The water for yeast activation should be warm, ideally between 105-115°F (40-46°C). Water that is too hot will kill the yeast, while water that is too cold will inhibit its activation, leading to a poor rise.
- Avoid Overmixing: While a smooth batter is desired, overmixing can sometimes negatively impact the final texture of gluten-free baked goods. Mix until the ingredients are just combined and no dry pockets remain.
- The Steam Secret is Key: The top parchment paper is your most valuable tool for achieving incredibly moist and soft buns. Do not skip this step! It creates a self-contained steaming environment that prevents the buns from drying out, mimicking the effects of a professional steam oven.
- Allow for Proper Cooling: It’s tempting to dive into warm, freshly baked goods, but allowing these buns to cool slightly (as specified in the instructions) is crucial. This cooling period helps them set their final structure and prevents them from having a gummy texture.
Storage and Refreshing Your Homemade Buns
Storage & Refreshing Instructions:
These delectable buns are undoubtedly at their peak when fresh from the oven, but they also store remarkably well. To maintain their freshness, place them in an airtight container and store them in the refrigerator for up to 4 days. When you’re ready to enjoy them again, simply refresh their texture and warmth by toasting them lightly in a toaster, oven, or on a grill until they are warmed through and have a slight crispness on the outside. This brings back their wonderful aroma and soft interior.
Freezing for Longer Shelf Life:
For longer-term storage, these gluten-free vegan burger buns freeze beautifully. Once they have completely cooled, stack them with small squares of parchment paper between each bun to prevent them from sticking together. Transfer them to a freezer-safe ziplock bag or an airtight container. They can be safely stored in the freezer for up to 2-3 months without compromising quality. To enjoy, simply thaw the frozen buns at room temperature, and then toast or grill them to revive their fresh taste and texture.
Creative Variations to Elevate Your Buns
Get Creative with These Additions:
Don’t be afraid to personalize your homemade burger buns with exciting additions. Here are some ideas to infuse extra flavor and character into your next batch:
- Fresh Herbs: Fold in 1-2 tablespoons of finely chopped fresh herbs such as rosemary, thyme, chives, or a mix of Italian herbs into the batter for an aromatic and savory twist.
- Garlic Infusion: For a rich, savory garlic bun, add 1-2 cloves of finely minced fresh garlic, or alternatively, 1/2 teaspoon of garlic powder to the dry ingredients.
- Spicy Jalapeños: If you love a little heat, incorporate 1-2 tablespoons of finely diced fresh or pickled jalapeños into the batter. For less heat, be sure to remove the seeds before dicing.
- Vegan Cheese Delights: Mix in about 1/4 cup of shredded vegan cheese (such as a cheddar or mozzarella style) into the batter. This will create cheesy, melt-in-your-mouth buns perfect for any savory filling.
- Subtly Sweet Buns: For a slightly sweeter bun that pairs wonderfully with fruit spreads, sweet fillings, or even breakfast sandwiches, increase the sugar to 2 tablespoons and consider adding a hint of cinnamon or vanilla extract.
These incredible buns were proudly shared at Allergy-Free Wednesdays, a testament to their widespread appeal and suitability for diverse dietary needs and preferences across the globe.
We hope you enjoy baking and savoring these delightful gluten-free and vegan burger buns. They are truly a game-changer and are sure to become a beloved staple in your kitchen, making every burger experience an absolute joy!