
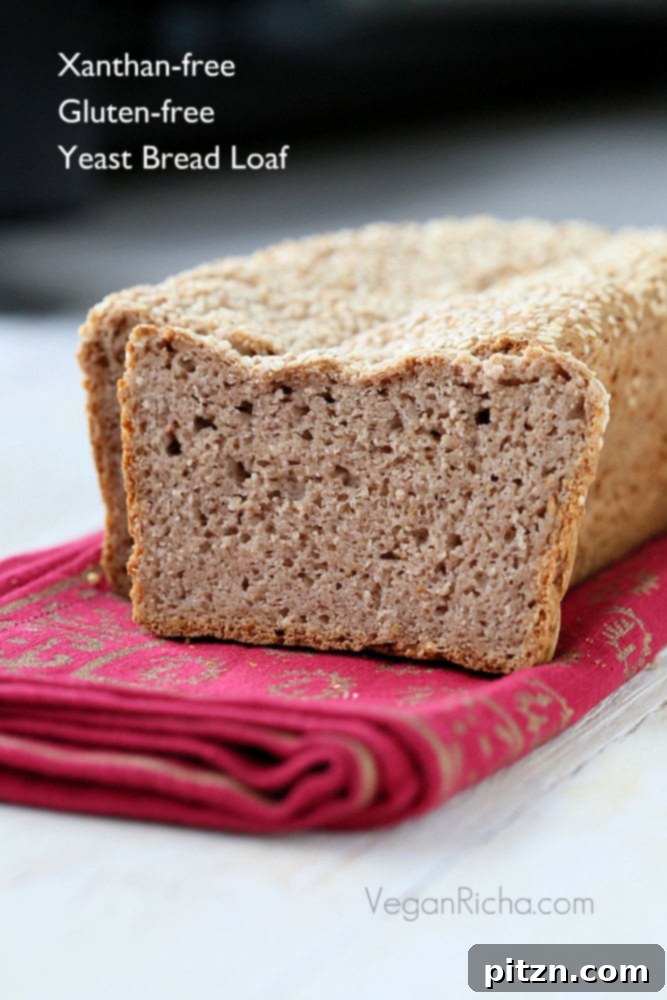
Mastering the Art of Gluten-Free Strawberry Sandwich Bread: A Vegan, Gum-Free Delight
Embark on a culinary journey to bake the perfect gluten-free, vegan sandwich bread – a truly revolutionary recipe that defies common baking challenges. For days, I pondered over sharing this gem, hesitant yet convinced of its undeniable brilliance. This isn’t just any gluten-free bread; it’s a game-changer: a yeast-leavened loaf that boasts a wonderfully soft and moist texture, completely free from gluten, dairy, eggs, and even gums like xanthan gum. If you’re searching for an allergy-friendly bread that doesn’t compromise on taste or texture, your quest ends here. Prepare to discover your new favorite homemade loaf!
The Secret to Superior Moisture: Harnessing the Power of Fruit Puree
For years, I’ve instinctively incorporated fruit purees into my regular (gluten-containing) yeast breads, a habit born from a desire to achieve an exceptionally soft and moist crumb without relying heavily on added fats like oil, butter, or dairy-free milk. This simple trick leverages nature’s sweetness and inherent moisture, transforming ordinary loaves into extraordinary ones. Whether it’s the vibrant notes of strawberries, the earthy depth of blueberries, the subtle sweetness of apples or pears, or even the vibrant hues of carrots and beets, seasonal fruits can elevate your bread to new heights, imbuing it with both flavor and an irresistible texture.
Baking gluten-free yeast bread often presents a significant hurdle: the notorious tendency for the final product to be dry, crumbly, and dense. Traditional methods sometimes suggest steaming the loaf during baking, which is indeed an excellent technique for achieving superior moisture and elasticity in gluten-free creations. However, if steaming isn’t an option for you, or even if you simply want an extra boost of tenderness and a forgiving crumb, fruit puree is your secret weapon. The natural sugars and pectin present in fruit purees expertly lock in moisture, ensuring your bread remains delightfully soft and tender, even when baked conventionally. The strawberry bread featured in these images is a testament to this innovative method – a loaf so moist and inviting, it will never leave your mouth feeling dry, regardless of how you choose to enjoy it.
Crafting the Perfect Gum-Free Loaf: A Baker’s Aspiration
Creating an airy, perfectly domed gluten-free loaf without the aid of artificial gums like xanthan gum or other traditional binders is a continuous passion project for many bakers. My ongoing experiments involve meticulously fine-tuning the precise amount of psyllium husk, a remarkable natural fiber that acts as a binder, providing much-needed structure and elasticity in gluten-free doughs. Additionally, I constantly adjust baking temperatures and methods to encourage that coveted rise and optimal shape. It’s a delicate balance: achieving both an internal airiness and a stable, beautiful dome without gums requires patience, precise adjustments, and a deep understanding of gluten-free flours. Yet, the results, as you’ll soon discover, are incredibly rewarding and well worth the effort.
Exploring Other Gluten-Free, Gum-Free Delights
If you’re new to the world of baking larger gluten-free sandwich loaves or simply prefer to start with something a bit less daunting, consider trying some of our other proven gum-free recipes. Our soft Focaccia-style Pizza Crust is a perennial fan favorite, offering a delightful chewy texture that has been successfully tried and tested by countless home bakers. Alternatively, our mini White Oat sandwich loaf provides a perfect introduction to the principles of gum-free baking, producing an equally impressive result. Both of these recipes are completely free of gluten and artificial gums, making them ideal choices for those with specific dietary needs or preferences.
A closer look at the photos of the mini oat loaf reveals its remarkable qualities: it’s noticeably airier, incredibly soft to the touch, and possesses a unique stretchy, squishy texture that remarkably mimics traditional gluten-containing bread. This exceptional texture is largely attributed to the magic of the steaming process during baking. If your kitchen setup allows, I highly recommend incorporating this technique for the strawberry loaf as well. Steam the loaf for the first 20 minutes of baking before continuing with the remainder of the conventional bake time. Steaming creates a moist, enclosed environment that allows the bread to rise optimally without forming a premature crust, developing an incredibly tender crumb and preventing it from drying out prematurely.
Storage and Enjoyment: Keeping Your Homemade Loaf Fresh
This gluten-free strawberry sandwich bread is truly at its peak freshness and flavor on the day it’s baked. To preserve its delightful qualities and extend its shelf life, store the loaf, well-wrapped, in the refrigerator for up to two days. When you’re ready to enjoy it again, simply slice off the desired amount and refresh it by toasting or grilling until warmed through and lightly crisped. This process helps to revive its texture and aroma.
For longer-term storage and to truly mimic that coveted “freshly baked” experience with minimal effort, I highly recommend a proactive approach: once the bread has cooled completely after baking, slice it immediately. Then, arrange the individual slices in a single layer on a baking sheet and freeze until solid. Once frozen, transfer the slices to a zip-top bag or airtight container, removing as much air as possible, and store them in the freezer. When a craving strikes, simply retrieve a few slices, allow them to thaw for a few minutes on the countertop, and then toast or grill them. You’ll be amazed at how this quick-freeze method preserves the bread’s soft, moist, and tender texture, making it perform almost identically to a freshly baked loaf. It toasts beautifully, becoming wonderfully tender and slightly crisp – perfect for slathering with your favorite earth balance spread, a rich nut butter, or even a dollop of homemade cashew cream.
Versatile Ways to Savor Your Homemade Loaf
Beyond its delicious plain taste, this gluten-free strawberry sandwich bread serves as an incredible and versatile base for a wide variety of culinary creations, transforming simple meals into delightful experiences:
- Gourmet Grilled Cheese: Believe it or not, the subtle sweetness of strawberry bread pairs exceptionally well with savory flavors. Try making a gourmet grilled cheese sandwich using a slice of your favorite dairy-free cheese, such as Daiya Pepperjack. The mild strawberry notes beautifully complement the spicy, tangy cheese, creating an unexpected yet utterly delightful flavor profile that will surprise and please your palate.
- Luxurious Cream Berry Toast: Elevate your breakfast or an afternoon snack with a decadent cream berry toast. Gently warm slices of the bread, then generously top them with a rich, velvety cashew cream. For an added layer of flavor and warmth, spike your cashew cream with a hint of cinnamon and a drizzle of maple syrup. Finish this masterpiece with a vibrant medley of fresh berries – blueberries, raspberries, or sliced strawberries. While the pictured bread features a strawberry multigrain wheat bread, the concept translates perfectly to this gluten-free version, promising a truly indulgent and visually stunning experience.
- Avocado Toast Reinvented: For a fresh, wholesome, and trendy option, lightly toast a slice of this bread and top it with creamy mashed avocado. Sprinkle with “everything bagel” seasoning for a savory crunch and finish with a squeeze of fresh lemon juice. The subtle fruit flavor of the bread adds an intriguing and refreshing twist to this classic.
- Sweet & Savory Pairings: Don’t limit yourself to sweet spreads! This unique bread can be a delightful accompaniment to savory vegan spreads like a homemade hummus, a creamy white bean dip, or a light vegetable paté. Its distinct profile offers a wonderful counterpoint to earthy and herbaceous flavors, making it suitable for appetizer platters or light lunches.
Enjoying the Loaf: A Day Later (Refrigerated)
The Quest for the Ultimate Gluten-Free Flour Blend
A thoughtful suggestion from one of our valued blog readers, Cathy, sparked an exciting new endeavor: to create a versatile, all-purpose gluten-free flour blend. She astutely noted that my typical ratio of oats, brown rice, tapioca, and potato starch – which I commonly employ in most of my successful gluten-free yeast bread recipes – could easily form the foundational base for such a comprehensive blend. Imagine the convenience! This blend could be perfectly suitable for everything from light and fluffy biscuits and tender scones to various quick breads and, of course, yeast-leavened loaves. This brilliant insight has propelled “developing a reliable all-purpose gluten-free blend” right to the very top of my baking to-do list! The possibilities are truly endless: one trusted blend for all your diverse gluten-free baking needs, simplifying the process and ensuring consistent, delicious results every time.
Step-by-Step Guide to Baking Your Gluten-Free Strawberry Sandwich Bread
Baking this unique and delicious gluten-free loaf is a surprisingly straightforward process, carefully designed to deliver exceptional results with clear, easy-to-follow instructions. By adhering to these steps, you’ll soon be enjoying a perfectly soft, wonderfully moist, and utterly delicious gluten-free vegan bread:
Preparation Steps:
- Combine Dry Ingredients: In a large mixing bowl, thoroughly whisk together all the dry ingredients (ground oats, teff flour, brown rice flour, tapioca starch, potato starch, baking powder, and salt). Ensure they are completely combined and evenly distributed. This prevents pockets of unmixed flour or uneven leavening.
- Proof the Yeast: In a separate small bowl, combine ½ cup warm water with the raw sugar (or maple syrup) and active dry yeast. Stir gently to dissolve the sugar and yeast. Let this mixture sit for about 5 to 10 minutes in a warm spot. You’re looking for a frothy, bubbly surface to form, which indicates your yeast is active and ready to work its magic.
Mixing the Dough:
- Activate Flaxseed and Psyllium: Once your yeast mixture is beautifully frothy, stir in the flaxmeal and ground psyllium husk. Mix thoroughly and let it sit for no more than 2 minutes. During this brief period, the mixture will absorb liquid and thicken, becoming slightly gelatinous. This forms a crucial binder for our gum-free bread, mimicking the elasticity of gluten.
- Prepare Strawberry Puree: In a blender or food processor, combine the hulled fresh strawberries, ¼ cup water, apple cider vinegar, and neutral-flavored oil. Blend until you achieve a perfectly smooth, consistent puree. This should yield approximately ¾ cup of puree, providing the essential moisture and a delicate fruit flavor for your loaf.
- Combine Wet and Dry: Carefully pour the activated yeast-flax-psyllium mixture and ¾ cup of the prepared strawberry puree into the large bowl containing your whisked dry ingredients.
- Mix to a Stiff Batter: Using a sturdy spoon or a flexible spatula, mix all the ingredients together vigorously until a stiff, sticky batter forms. The consistency should be thick enough to hold its shape somewhat, but it will still be noticeably wet and sticky, not a kneadable dough. If the dough appears too dry or stiff, gradually add an additional tablespoon (or two) of strawberry puree or warm water, one at a time, until the desired sticky consistency is achieved. It’s always better to err on the side of a slightly stiffer, stickier dough rather than a runny one for a good sandwich loaf. Ensure no dry flour pockets remain visible.
Shaping and Rising:
- Prepare the Pan: Line an 8.5 x 4.5-inch standard bread pan with parchment paper, allowing some overhang on the longer sides to create “handles” for easy removal. Alternatively, grease the pan very thoroughly. Drop the stiff batter into the prepared pan.
- Shape the Loaf: Lightly spray the top surface of the batter with water, or dampen your hands. Then, gently pat down and smooth the top to shape it into a neat, uniform loaf. This step helps create a smooth crust and aids in an even rise.
- Add Toppings & Rise: If desired, sprinkle the top of the loaf with sesame seeds, oats, or a light dusting of gluten-free flour for an appealing, rustic finish. Cover the pan loosely with a clean, light kitchen towel and place it in a warm, draft-free spot to rise. The rising time, typically between 30-40 minutes, will depend significantly on the ambient temperature of your room. Allow the dough to rise until it is approximately 1.5 times its original size. Remember, a slow and steady rise is preferable to a very fast one, as it contributes to a better internal structure and helps prevent the bread from collapsing post-baking.
Baking and Cooling:
- Pre-heat Oven: As soon as your dough has visibly risen to the desired volume (about 1.5 times its initial size), begin pre-heating your oven to 385 degrees F (195 degrees C).
- Bake: Carefully transfer the pan to the pre-heated oven and bake for 40 minutes.
- Steam (Optional, Highly Recommended): For the absolute softest, most tender, and fluffiest gluten-free bread, especially with mini loaves, consider steaming the bread for the first 20 minutes of baking. You can do this by placing a pan of hot water on the bottom rack of your oven, or using a cloche/Dutch oven. After 20 minutes of steaming, remove the water bath (if applicable) and continue baking for another 15-20 minutes conventionally. This added moisture during the initial bake promotes an incredibly tender and moist crumb. Even without steaming, thanks to the fruit puree, your bread will still be wonderfully soft.
- Cool Completely: Once baked, remove the bread from the oven and immediately take it out of the pan (using the parchment handles, if applicable). Transfer the hot loaf to a wire rack and allow it to cool completely, undisturbed, before attempting to slice. This step is absolutely crucial for gluten-free bread; slicing warm gluten-free bread can lead to a gummy texture and crumbly, uneven slices. Patience here is truly key for the best results!
While it might not appear overtly soft in photographs, rest assured, its texture is incredibly tender and moist. Believe me!
Recipe: Gluten-Free Strawberry Sandwich Bread Loaf
This recipe yields one generously sized 8.5 x 4.5-inch loaf of pure, wholesome deliciousness.
Allergen Information: This recipe is meticulously crafted to be free of common allergens, including Dairy, Egg, Corn, Soy, Nuts, Xanthan Gum, and Gluten, making it an excellent choice for those with multiple dietary sensitivities.
Ingredients:
- ½ cup warm water (ideally 105-115°F or 40-46°C, for yeast activation)
- 2 teaspoons active dry yeast
- 1 Tablespoon raw sugar or 2 Tablespoons maple syrup (to feed the yeast)
- 1 Tablespoon flaxmeal (ground flaxseeds)
- 2 teaspoons ground psyllium husk (not whole psyllium husks, ensure it’s finely ground)
Dry Ingredients:
- 1 cup ground oats (essential to use certified gluten-free oats if avoiding gluten)
- ¼ cup teff flour (or substitute with sorghum flour, millet flour, or another preferred gluten-free whole grain flour for a different flavor profile)
- ½ cup brown rice flour
- ½ cup tapioca starch
- ⅓ cup potato starch (not potato flour)
- ½ teaspoon baking powder
- ¾ teaspoon fine sea salt
Strawberry Puree:
- 4 fresh strawberries, hulled
- ¼ cup water
- ¼ teaspoon apple cider vinegar (or white vinegar, adds a subtle tang and helps with rise)
- 2 Tablespoons neutral-flavored oil (e.g., canola, grapeseed, or light olive oil for added moisture and richness)
Method:
- Proof the Yeast: In a small bowl, combine ½ cup warm water, sugar (or maple syrup), and active dry yeast. Stir gently to mix. Let this mixture sit for 5 minutes until it becomes frothy and bubbly, indicating the yeast is active.
- Activate Flaxseed and Psyllium: Once the yeast mixture is frothy, add the flaxmeal and ground psyllium husk. Stir thoroughly and let the mixture sit for no more than 2 minutes. It will thicken and become a bit gel-like, forming a critical binder.
- Prepare Strawberry Puree: In a blender, combine the hulled strawberries, ¼ cup water, vinegar, and oil. Blend until the mixture is completely smooth and free of lumps. This should yield approximately ¾ cup of puree.
- Combine Dry Ingredients: In a large mixing bowl, thoroughly whisk together all the dry ingredients: ground oats, teff flour, brown rice flour, tapioca starch, potato starch, baking powder, and salt. Ensure they are well combined.
- Mix Wet into Dry: Pour the activated yeast-flax-psyllium mixture and ¾ cup of the prepared strawberry puree into the bowl with the dry ingredients.
- Form the Batter: Using a sturdy spoon or spatula, mix vigorously until a stiff, sticky batter-like dough forms. The dough should be thick and cohesive, but still quite wet and sticky. If the dough appears too dry or stiff, gradually add an additional tablespoon of strawberry puree or warm water, one at a time, until the desired sticky consistency is achieved. For a sandwich loaf, it’s best to keep the dough on the slightly stiffer side, ensuring no dry flour pockets remain.
- Prepare Pan & Shape: Line an 8.5 x 4.5-inch bread pan with parchment paper or grease it thoroughly. Drop the batter/dough into the prepared pan. Lightly spray the top of the dough with water (or dampen your hands) and gently pat it down to shape it into an even loaf.
- Add Toppings & Rise: Sprinkle the top with sesame seeds, oats, or a light dusting of flour, if desired. Cover the pan loosely with a clean kitchen towel and let it rise in a warm, draft-free place for 30-40 minutes. The rising time will vary based on ambient temperature; the dough should rise to about 1.5 times its original volume.
- Preheat Oven: As soon as the dough has adequately risen, preheat your oven to 385 degrees F (195 degrees C).
- Bake: Bake the bread in the pre-heated oven for 40 minutes.
- Optional Steaming for Softness: For an exceptionally soft and fluffy loaf, consider steaming the bread for the first 20 minutes of baking (as demonstrated with our White Oat Mini Loaf). Then, continue baking for another 15-20 minutes without steam. Even without steaming, the fruit puree ensures a tender crumb.
- Cool Completely: Remove the baked bread from the oven and immediately take it out of the pan. Transfer it to a wire rack to cool completely before slicing. This crucial step prevents a gummy texture and ensures clean, well-formed slices.
- Enjoy or Store: Slice and enjoy your fresh loaf! If not planning to consume the same day, slice and freeze the cooled bread for optimal long-term freshness.
Baker’s Notes:
- The Importance of a Slow Rise: For the best internal structure and to prevent your bread from collapsing in the middle after baking, ensure your dough rises slowly in a warm, but not excessively hot, environment. A rapid rise can weaken the dough’s structure.
- Dough Consistency for Loaves: For a well-structured sandwich loaf that holds its shape, it’s crucial to maintain a stiffer, sticky dough consistency. If you were adapting this recipe for a flatbread or pizza crust, you could opt for a slightly looser, moister batter.
- Experiment with Fruits: While strawberry offers a delightfully mild and subtly sweet flavor, feel free to experiment with other fruit purees like apple, pear, or even a blend of berries, to create your own signature gluten-free bread flavors.
We’re delighted to share this incredible gluten-free strawberry sandwich bread recipe with the community!