
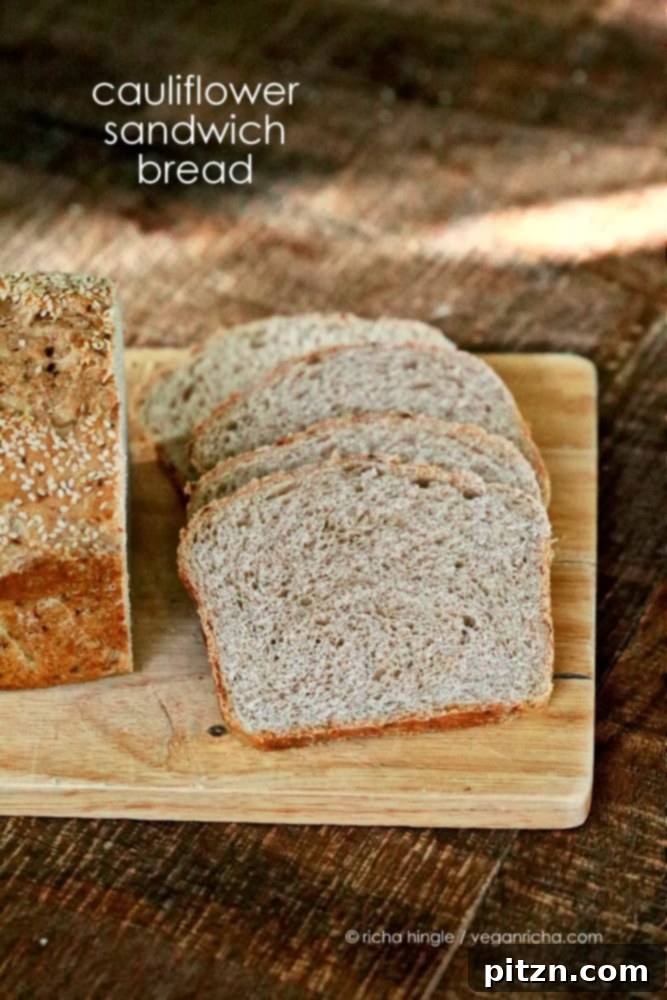
Unlock the secret to an incredibly moist, flavorful, and secretly healthy sandwich bread that will revolutionize your breakfast and lunch routines. What’s the star ingredient transforming this loaf from good to gourmet? You guessed it: cauliflower! This versatile vegetable works wonders, and in this recipe, it adds an undetectable layer of nutrition and delightful texture, proving once again that cauliflower truly knows no bounds in the kitchen.
Discover the Best Vegan Cauliflower Sandwich Bread Recipe
Prepare to be amazed at how easily you can incorporate this powerhouse vegetable into your baking. Using a high-speed blender, like a Blendtec, makes light work of processing the cauliflower. Simply chop it into small florets and pulse in batches (about 1.5 to 2 cups at a time) to create perfect cauliflower “rice.” This finely textured cauliflower seamlessly integrates into the dough, contributing moisture and a subtle savory depth without any overpowering taste. We’ve enhanced its natural profile with fragrant cumin and a blend of aromatic herbs, giving this vegan sandwich bread a distinctively savory character. Feel free to customize with your favorite spices or even omit them for a simpler, classic loaf – the choice is entirely yours! This unique addition not only boosts the nutritional value but also keeps the bread wonderfully soft and fresh for longer.
Your New Go-To Healthy Vegan Sandwich Loaf: Versatility on a Plate
This isn’t just any sandwich bread; it’s a remarkably delicious, easy-to-make, and incredibly versatile staple for your kitchen. Its robust structure and delightful flavor make it perfect for classic sandwiches, holding up beautifully to various fillings, from creamy avocado to savory grilled vegetables. But its utility extends far beyond! Imagine golden, crispy homemade croutons adding a savory crunch to your salads or soups. Or elevate your brunch game by transforming slices of this bread into incredible Savory French Toasts, perhaps even stuffed with spiced samosa potatoes for an unforgettable, hearty meal. This plant-based bread also makes a fantastic side for your favorite curries or stews, soaking up all the delicious flavors. The possibilities are truly endless with this wholesome loaf.
As the days turn cooler, a warm, freshly baked loaf is pure comfort. This recipe brings that comforting aroma right into your home, making any day feel like a special occasion. It’s an excellent way to introduce more vegetables into your family’s diet without them even realizing it, making it a win-win for both taste and health.
Explore More Delicious Vegan Bread Recipes from Our Kitchen
If you’re as passionate about homemade bread as we are, you’ll love exploring the diverse range of sandwich loaves available on our blog. Each recipe is crafted to be delicious, wholesome, and entirely plant-based, offering options for every taste and preference and ensuring you always have a fresh loaf on hand:
- Everyday Sandwich Loaf: A simple, reliable recipe for daily use.
- Hearty Lentil Wheat Loaf: Packed with protein and fiber for a nutritious twist.
- Seasonal Pumpkin Bread Loaf: Perfect for autumn, with a hint of natural sweetness.
- Robust Rye Almond Loaf: A flavorful bread, ideal for gourmet sandwiches.
- Classic White Sandwich Loaf: The beloved classic, veganized and perfected.
- Wholesome Multi-grain Buns: Great for burgers, sliders, or dinner rolls.
- Flavorful 100% Whole Grain Tomato Basil Focaccia: An aromatic, rustic bread perfect for sharing.
Celebrate with Our Vegan Diwali Sweets E-book: Traditional Flavors, Plant-Based Delights
Diwali, the resplendent festival of lights, stands as one of India’s most significant and joyous celebrations, typically occurring in early November. A cornerstone of these festivities is the abundant array of traditional sweets and desserts. However, many of these cherished recipes heavily rely on dairy products like ghee and milk, posing a considerable challenge for those embracing a vegan lifestyle. Just like any major holiday around the globe, there’s a growing enthusiasm for “vegan-izing” beloved family recipes to ensure everyone can partake in the culinary traditions without compromise.
The journey to find commercially available vegan Indian sweets, especially in countries like the United States, is often fruitless, and options within India are still quite limited. This inspired us to dedicate ourselves to creating plant-based versions of popular Indian festival sweets that truly capture their authentic essence. Our goal is to empower you to recreate these delicious, traditional flavors right in your own kitchen, ensuring that no one misses out on the sweet spirit of Diwali. We’re thrilled to have compiled a comprehensive collection of these perfected recipes into our exclusive Vegan Diwali Sweets E-book. This e-book is more than just recipes; it’s a celebration of culture and compassion.
For those unfamiliar with the intricate names and vibrant flavors of traditional Indian sweets, prepare for an exciting culinary adventure! While the terminology might be new, the tastes are undeniably delicious and wonderfully addictive, promising a delightful experience for everyone. We’ve meticulously developed these recipes to stay true to their traditional essence wherever possible, meaning some maintain a similar oil content to their ghee-laden counterparts for that authentic richness and mouthfeel. Yet, a significant number of recipes within the e-book are also crafted to be low-fat, utilizing minimal or no refined oil, and many incorporate natural sweeteners such as maple syrup for a healthier touch. Furthermore, we’ve made sure to highlight gluten-free options wherever feasible, making this collection accessible to an even wider audience with varying dietary needs. Each recipe is designed to be approachable for home cooks, allowing you to master these festive treats with confidence.
We understand that seamless access is key when you’re eager to start baking. We’ve successfully resolved the PayPal checkout issue on the E-book page, so you can now conveniently complete your purchase without requiring a PayPal login. This makes acquiring your copy simpler and faster than ever, getting you to your delicious vegan sweets sooner!
For our readers who enjoy reading on the go, we’re delighted to share that the PDF version of the e-book converts beautifully to Kindle format. Just send the PDF to your Kindle ID, and it will automatically transform into a perfectly formatted e-book for your device, allowing you to carry a treasure trove of vegan Indian sweets wherever you go – whether you’re in the kitchen or planning your next festive feast.
Your incredible support has been truly humbling and heartwarming. We are so grateful to see so many of you purchasing the e-book and enthusiastically trying out the recipes! Your engagement, feedback, and stories mean the world to us and inspire us to keep creating and innovating. Please continue to share the Vegan Diwali Sweets E-book page with your friends and family, and don’t hesitate to share your experiences and delightful creations in the comments section. Let’s spread the word that vegan Indian sweets are not only possible but utterly delicious and achievable at home! If ever an Indian restaurant claims they can’t make something vegan, you can confidently tell them, “Yes, we can, and here’s how to make it!”
Baking Your Cauliflower Sandwich Bread: A Step-by-Step Guide for Success
Embark on your journey to baking the perfect cauliflower sandwich bread with these clear, easy-to-follow steps. Precision and patience are your best friends in bread making, ensuring a loaf that’s both beautifully textured and incredibly delicious.
Step 1: Prepare the Cauliflower “Rice”
Begin by processing your cauliflower. Thanks to modern kitchen appliances like the Blendtec or any good food processor, this step is remarkably simple and quick. Break the cauliflower into small florets. Place them into your processor in batches, about 1.5 to 2 cups at a time, and pulse a few times until you achieve a fine, rice-like texture. This ensures it blends seamlessly into your dough without leaving noticeable chunks, adding moisture and nutrients discreetly.
Step 2: Activate Yeast and Combine Ingredients
Gather all your ingredients and measure them accurately. First, “proof” your yeast: mix the active yeast with 1/4 cup of warm water and a touch of sugar or maple syrup. Let it sit for 5-7 minutes until it becomes frothy – this crucial step indicates your yeast is alive and ready to work its magic, ensuring a good rise for your bread. In a large mixing bowl, thoroughly combine the flours, salt, optional spices (cumin powder and Italian herbs), and the prepared cauliflower rice. Pour in the activated yeast mixture, the olive oil, and 3/4 cup of the remaining warm water. Mix everything together until a shaggy, cohesive dough begins to form.
Step 3: Knead to Perfection
Transfer the dough to a lightly floured surface and knead it for approximately 6-8 minutes. This crucial step develops the gluten, resulting in a soft, smooth, and elastic dough. A well-kneaded dough is key to a light, airy, and wonderfully textured bread. If the dough feels too dry, add the remaining 2 tablespoons of water gradually, one at a time. If it’s too sticky, add a tiny bit more flour until the perfect consistency is achieved.
Step 4: First Rise (Bulk Fermentation)
Lightly oil the mixing bowl (or use the one you just used), place the dough back in, and lightly spray the surface of the dough with water to prevent it from drying out. Cover the bowl with a clean kitchen towel or plastic wrap. Allow the dough to rise in a warm, draft-free place until it has visibly doubled in size. This typically takes 1.5 to 2 hours, but timing can vary depending on your ambient room temperature and the activity of your yeast. Patience at this stage will be richly rewarded with a superior crumb structure.
Step 5: Shape the Loaf and Second Rise (Proofing)
Gently punch down the risen dough to release the air. On a lightly floured surface, shape the dough into a rectangle, then roll it tightly into a log, resembling a jelly roll. Ensure the seam is facing down. Place the shaped dough into a greased (or parchment-lined) 9×5 inch bread pan, seam-side down. Generously spray the top with water and sprinkle with sesame seeds or oats for a lovely crust and added texture and flavor. Cover again loosely with a towel and let it rise for another 40-45 minutes, or until it has almost doubled in size again. This final rise, known as proofing, is crucial for the bread’s final volume, light texture, and characteristic shape. The exact time will depend on your room’s temperature and humidity.
Step 6: Bake to Golden Perfection
Once your bread has risen adequately (it should be notably more than 1.5 times its original size), preheat your oven to 375 degrees F (190 degrees C). Bake for 35-40 minutes, or until the crust is beautifully golden brown and the internal temperature reaches around 200-210 degrees F (93-99 degrees C) when tested with an instant-read thermometer. Immediately remove the bread from the pan and let it cool completely on a wire rack before slicing. Cooling fully is vital for the bread’s internal structure, preventing a gummy interior, and allowing the flavors to fully develop and settle. Resist the urge to slice too early!
Vegan Cauliflower Sandwich Bread: The Complete Recipe
This delightful bread is not only delicious and versatile but also caters to various dietary needs, making it a fantastic addition to any plant-based kitchen.
Allergen Information: This recipe is naturally free of Dairy, egg, corn, soy, and nuts, making it a great choice for those with common food sensitivities.
Ingredients:
- 1 cup + 2 Tablespoons Warm Water (ensure it’s around 105-115°F / 40-46°C for optimal yeast activation)
- 1 Tablespoon Active Dry Yeast
- 1 Tablespoon Raw Sugar or Maple Syrup (to feed the yeast)
- 2 cups Unbleached White Flour or Bread Flour (for structure and a lighter crumb)
- 1 cup Whole Wheat Flour (adds fiber, nutrients, and a slightly heartier texture)
- 1 packed cup Cauliflower Rice (finely grated or pulsed from approximately 1.5-2 cups small florets)
- 1 1/4 tsp Sea Salt (enhances flavor and controls yeast activity)
- 1/4 tsp Cumin Powder (optional, adds a warm, savory depth)
- 1/4 tsp Italian Herb Blend (optional, for aromatic notes and savory complexity)
- 1 Tablespoon Extra Virgin Olive Oil (optional, contributes to tenderness and crust flavor)
- Optional: Sesame seeds or Oats for sprinkling on top (for texture and visual appeal)
Method:
- Activate the Yeast: In a small bowl, combine 1/4 cup of the warm water with the sugar (or maple syrup) and the active dry yeast. Stir gently to dissolve, then let it sit undisturbed for 5-7 minutes, or until a frothy layer forms on top. This foam indicates your yeast is active and ready to leaven your bread.
- Prepare Cauliflower: While the yeast proofs, prepare your cauliflower. Break approximately 1.5 to 2 cups of small cauliflower florets into smaller pieces. Place them into a food processor or a high-speed blender (like a Blendtec) and pulse a few times until you achieve a fine, rice-like consistency. Measure out exactly 1 packed cup of this cauliflower rice.
- Combine Dry Ingredients: In a large mixing bowl, thoroughly combine the unbleached white flour, whole wheat flour, sea salt, cumin powder (if using), and Italian herb blend (if using). Add the prepared cauliflower rice to the dry ingredients and mix well to ensure even distribution.
- Form the Dough: Pour the activated yeast mixture, extra virgin olive oil (if using), and 3/4 cup of the remaining warm water into the bowl with the dry ingredients. Mix everything together with a sturdy spoon or spatula until a shaggy dough forms and most of the flour is incorporated.
- Knead: Transfer the dough to a lightly floured surface. Knead for 6-8 minutes. During kneading, the dough should become smooth, elastic, and slightly tacky. If the dough feels too dry and stiff, add the remaining 2 tablespoons of water gradually, one tablespoon at a time, until the dough reaches the ideal consistency. If it’s too sticky, incorporate a tiny bit more flour. Proper kneading is essential for developing gluten, which gives bread its structure and chewiness.
- First Rise (Bulk Fermentation): Lightly oil the mixing bowl (you can use the same one you used for combining ingredients). Place the kneaded dough back into the bowl. Lightly spray the top of the dough with a little water or brush with a thin layer of oil to prevent a crust from forming. Cover the bowl with a clean kitchen towel or plastic wrap. Let the dough rise in a warm, draft-free place for 1.5 to 2 hours, or until it has visibly doubled in size. The duration of the rise depends on the ambient temperature and yeast activity.
- Shape the Loaf: Gently “punch down” the risen dough to release the accumulated air. Transfer the dough to a lightly floured surface. Shape the dough into a rectangle, approximately the length of your bread pan. Roll the rectangle tightly into a log, much like a jelly roll. Ensure the seam is sealed and facing down.
- Second Rise (Proofing): Place the shaped dough into a greased (or parchment-lined) 9×5 inch bread pan, ensuring the seam side is down. Generously spray the top of the dough with water and sprinkle with sesame seeds or oats, if desired, for an attractive finish and added flavor. Cover loosely with a towel and let it rise again for approximately 40-45 minutes, or until it has nearly doubled in size. This final rise, known as proofing, is crucial for the bread’s final volume, light texture, and characteristic shape. Keep an eye on it; the exact time will depend on your room’s temperature.
- Preheat Oven & Bake: Towards the end of the second rise (when the bread has risen more than 1.5 times its original size), preheat your oven to 375°F (190°C). Bake the bread for 35-40 minutes, or until the crust is beautifully golden brown and the loaf sounds hollow when tapped on the bottom. For precise results, the internal temperature should read between 200-210°F (93-99°C) on an instant-read thermometer.
- Cool: Carefully remove the bread from the pan immediately after baking and transfer it to a wire rack. This allows air to circulate around the entire loaf, preventing it from becoming soggy. It is absolutely critical to let the bread cool completely before slicing. This process allows the internal starches to set, preventing a gummy interior and allowing the flavors to fully develop. Do not slice until fully cooled, typically 1-2 hours.
Remember those beautiful, rustic bread slices that formed the base of our “finger” sandwiches? They were none other than this very delicious cauliflower bread – a testament to its wonderful texture and versatile flavor profile, perfect for elevating any meal.
We’re thrilled to share this innovative recipe, and it’s being proudly featured at Ricki’s Wellness Weekend, a platform dedicated to healthy and inspiring culinary creations. We invite you to bake a loaf and experience the delightful blend of health and homemade goodness that this unique cauliflower bread offers!
Join Our Community of Plant-Based Bakers!
We absolutely love seeing your culinary creations! If you try this incredible Vegan Cauliflower Sandwich Bread recipe, or any of our other delicious plant-based delights, please share your experiences, tips, and photos in the comments below. Your feedback and stories inspire us to keep creating and innovating in the vegan kitchen. Don’t forget to tag us on social media so we can celebrate your baking successes and share your amazing results with our community! Happy baking, and most importantly, happy eating!