
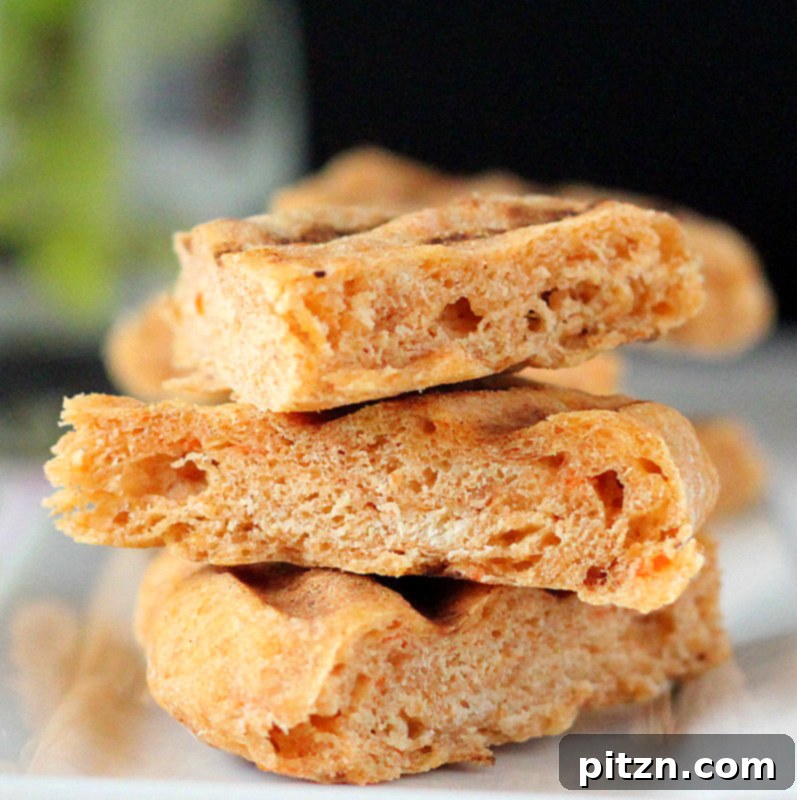
Discover a truly unique and wholesome treat with our Vegan Tomato, Wheat, and Sprouted Quinoa Flatbread. This versatile flatbread is perfect for crafting delicious sandwiches, serving as a flavorful snack, or accompanying your favorite plant-based meals. Combining the rich tang of fresh tomatoes with the hearty goodness of whole wheat and the exceptional nutritional boost of sprouted quinoa, this recipe is a testament to delicious and healthy vegan living.
Jump to Recipe
Embracing Savory Breads: A Culinary Journey
Typically, my kitchen is filled with the aroma of fruit-infused whole grain breads, which perfectly complement breakfast and satisfy my love for sweet baked goods. My previous forays into savory bread making usually leaned towards mild, herb-infused creations. However, a recent request for a dedicated tomato bread sparked a new culinary adventure. This presented the perfect opportunity to experiment with some sprouted quinoa I had on hand.
While a portion of the sprouted quinoa was destined for a delightful pilaf recipe (which I’ll be sharing soon!), I was eager to incorporate its nutritional power into a bread loaf. The result? This fantastic tomato bread dough, enriched with the added goodness of sprouted quinoa. It’s a delightful departure from my usual sweet recipes and has quickly become a new favorite.
If you enjoy wholesome, homemade breads, you might also like some of my earlier creations. For another savory option, check out my Mung Bean Sprouts Sandwich Loaf. And for those who still crave a touch of sweetness, my fruit breads are always a hit, such as the Blueberry Apple Mini Loaf (featuring wheat, quinoa, and oat for a wholesome blend) and the indulgent Strawberry Mango Molasses Mini Loaf. Each offers a unique flavor profile while staying true to our vegan and health-conscious ethos.
This recipe yields enough dough for one mini 5×3 inch loaf or several flatbreads. We opted for flatbreads to pair perfectly with our baked portobello, tomato, and avocado sandwiches – a truly delightful combination!
The Power of Sprouted Quinoa: A Nutritional Boost
Quinoa is celebrated as an exceptional “supergrain” and for good reason. It stands out as a complete protein, providing all nine essential amino acids that our bodies cannot produce on their own. This makes it an invaluable addition to any diet, especially for those following a vegan or vegetarian lifestyle. I’ve been on a bit of a quinoa spree lately, finding myself adding this nutrient-dense grain to almost everything I cook!
The benefits of quinoa are amplified when it’s sprouted. Sprouting initiates a remarkable transformation, unlocking a cascade of nutritional advantages. It’s a simple yet powerful process that makes this already healthy grain even better for you. Here’s how to sprout quinoa and why it’s so beneficial:
How to Sprout Quinoa:
- Rinse Thoroughly: Begin by washing your quinoa vigorously 2-3 times under cold running water. This helps remove saponins, a natural coating that can give quinoa a bitter taste.
- Initial Soak: Place the rinsed quinoa in a bowl and cover it generously with water. Let it soak overnight (approximately 8-12 hours).
- Regular Rinsing: The next day, drain the water completely. Rinse the quinoa thoroughly and then place it back in the bowl, ensuring it’s only slightly damp – just enough to keep it moist but not submerged. Cover the bowl with a breathable cloth or lid that allows for air circulation.
- Continuous Refreshment: Rinse and drain the quinoa every 4 hours throughout the day. By the end of the day, you should see tiny sprouts, about 1/4 inch long, emerging from the grains. These delicate sprouts are a sign that the quinoa’s nutritional properties have begun to multiply. I typically use mine the next morning once the sprouts have nicely formed.
Why Sprout Quinoa?
Sprouting quinoa is a crucial step for several reasons. It effectively neutralizes phytates and enzyme inhibitors naturally present in the grain. These compounds can hinder the absorption of vital minerals and make quinoa harder to digest. By breaking down these inhibitors, sprouting significantly enhances the bioavailability of nutrients, making them more accessible to your body.
Furthermore, sprouting dramatically increases the vitamin content, particularly B vitamins and Vitamin C, and boosts the activity of natural enzymes within the grain. When you eat sprouted quinoa, you’re not just consuming a seed; you’re consuming a complete, living plant that is teeming with life force and packed with heightened nutrition. This makes your flatbread not just delicious, but also incredibly wholesome and easy to digest.
Wholesome Vegan Tomato, Wheat, and Sprouted Quinoa Flatbread
Vegan Richa
30 mins
25 mins
55 mins
3-4 breads
Bread
Indian, Vegan

Print Recipe
Ingredients
- 2/3 cup bread flour + 1/4 cup more for kneading and dusting
- 1/2 cup whole wheat flour (for a totally white and even squishier bun, use all bread flour)
- 3 Tablespoons sprouted quinoa (can be substituted with cooked quinoa, omitted, or any other sprouted grain)
- 1 teaspoon raw sugar or equivalent jaggery/agave/maple syrup or other sweeteners
- 1.5 teaspoons quick rise yeast
- 1/4 cup water
- 2 Tablespoons Virgin olive oil
- 3/4 teaspoon salt or to taste
- 1 roma tomato or any juicy medium tomato
- 1/2 teaspoon dried basil flakes
Instructions
-
Activate the Yeast: In a small bowl, combine the quick rise yeast and 1 teaspoon of sugar with 2 tablespoons of warm water. Stir gently until the sugar dissolves and the yeast is fully incorporated. Let this mixture sit for about 10 minutes, or until it becomes frothy and bubbly, indicating the yeast is active. This is a crucial step for a light and airy flatbread.
-
Prepare the Tomato-Quinoa Puree: In a blender or food processor, combine the whole roma tomato (or other juicy medium tomato), 3/4 teaspoon of salt, 2 tablespoons of virgin olive oil, and the sprouted quinoa. Process until you achieve a well-blended, smooth puree. This mixture will provide the vibrant tomato flavor and additional moisture for the dough.
-
Combine Dry and Wet Ingredients: In a large mixing bowl, add the bread flour, whole wheat flour, and dried basil flakes to the activated yeast mixture. Give it a quick mix to lightly combine.
-
Form the Dough: Pour the tomato-quinoa puree into the flour and yeast mixture. Mix for a few seconds until the ingredients just start to come together.
-
Knead the Dough: Transfer the shaggy dough to a lightly floured surface or a stand mixer fitted with a dough hook. Knead the dough for 4-5 minutes until it becomes soft, smooth, and elastic. If kneading by hand, use a push-fold-turn motion. If using a stand mixer, scrape down the sides of the bowl every 2 minutes to ensure even kneading. Adjust with small quantities of additional bread flour if the dough is too sticky, or a tiny bit of water if it’s too stiff, aiming for a soft, pliable dough.
-
First Rise (Proofing): Lightly grease a clean bowl or container with olive oil. Place the kneaded dough inside, turning it once to coat all sides. Lightly spritz the top of the dough with a little water, then a touch of oil to prevent a crust from forming. Cover the bowl with a clean kitchen towel or plastic wrap and let it rise in a warm, draft-free place for about an hour, or until it has doubled in size. At this stage, you can also refrigerate the dough for up to 2 days for later use.
-
Bring to Room Temperature (if refrigerated): If you chose to refrigerate your dough, remove it from the refrigerator and let it rest at room temperature for at least an hour before proceeding. This allows the dough to relax and become workable again.
-
Shape the Flatbreads or Loaf: Gently punch down the risen dough to release the air. Divide the dough into 3-4 equal balls, depending on your desired flatbread size. (Alternatively, you can shape the entire dough into a mini loaf, place it in a greased mini loaf pan, let it rise for another 30 minutes, and then bake at 350 degrees F (175 C) for approximately 20 minutes until golden brown.)
-
Roll Out Flatbreads: On a well-floured surface, take each dough ball and roll it out into a round or oval shape about 5 inches in diameter and a nice thickness (roughly 1/4 to 1/2 inch). These thicker flatbreads are ideal for serving as buns for sandwiches or burgers.
-
Cook the Flatbreads: Heat a grill pan or a thick-bottomed skillet over high heat until it’s very hot. Place a rolled-out flatbread onto the hot pan and grill for 2-3 minutes per side, or until beautiful grill marks appear and the bread is cooked through with a slight puff. For an alternative baking method, preheat your oven to 450 degrees F (230 C) with a pizza stone inside. Bake the flatbreads directly on the hot pizza stone, similar to pita bread, until puffed and lightly browned.
-
Serve and Enjoy: Once cooked, slice the warm flatbread into triangles for dipping, use them whole as sandwich buns, or simply enjoy them as is. They are wonderfully versatile! Consider dipping them in herbed olive oil for an extra burst of flavor. Have a fun and delicious day exploring all the ways to enjoy your homemade flatbread!
Notes
- Total time listed does not include the essential 1.5 hours of proving (rising) time for the dough.
- Nutritional value provided is based on a single serving. Please note that these are approximations and may vary depending on exact ingredient brands and preparation methods.
- Storage: Leftover flatbreads can be stored in an airtight container at room temperature for 2-3 days or frozen for up to 2 months. Reheat gently in a pan or oven.
- Variations: Feel free to experiment with other herbs like oregano or thyme. You can also add a pinch of garlic powder for extra savory depth.
- Serving Suggestions: Beyond sandwiches, these flatbreads are excellent with hummus, baba ghanoush, or as a side to lentil soups and curries.
Nutrition
Calories: 337kcal
,
Carbohydrates: 49g
,
Protein: 10g
,
Fat: 11g
,
Saturated Fat: 1g
,
Sodium: 589mg
,
Potassium: 338mg
,
Fiber: 5g
,
Sugar: 2g
,
Vitamin A: 340IU
,
Vitamin C: 5.6mg
,
Calcium: 22mg
,
Iron: 1.9mg
Nutrition information is automatically calculated, so should only be used as an approximation.
Did you make this recipe? Share your thoughts and experiences below!
This fantastic flatbread recipe is a perfect contribution to weekly culinary celebrations like Susan’s Weekly Yeastspotting, a showcase for all things yeast-leavened, and Ricki’s Wellness Weekend, dedicated to healthy and delicious recipes. We hope you enjoy making and sharing this wholesome, flavorful flatbread as much as we do!