
Irresistible Vegan Chocolate Swirl Bread: A Delightful Homemade Recipe
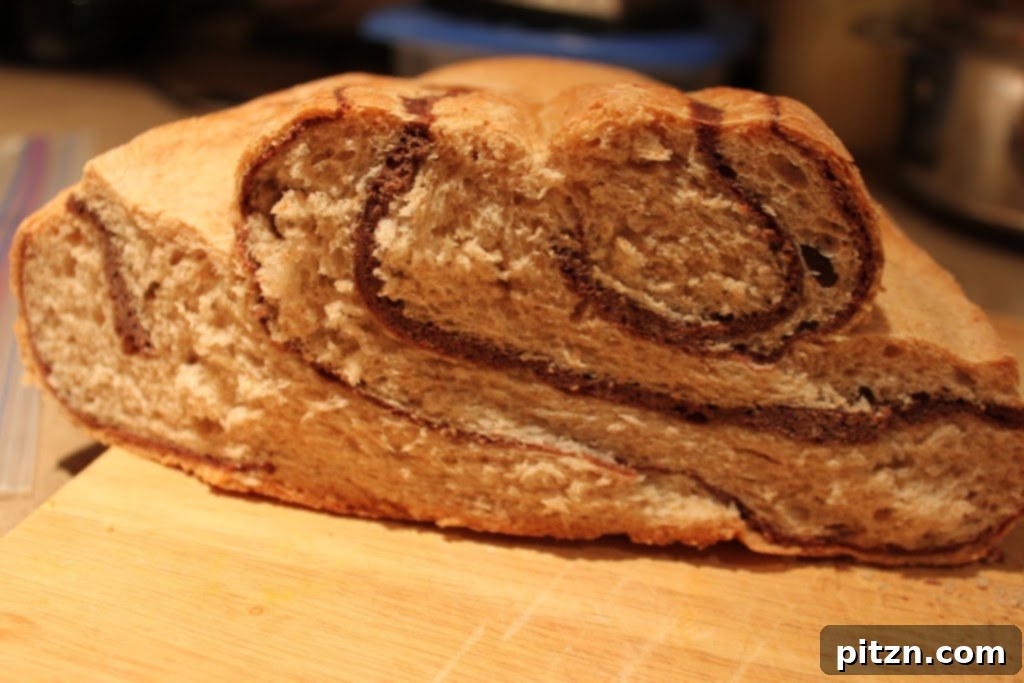
Discover how to bake the most beautiful and utterly delicious vegan chocolate swirl bread. This visually stunning loaf, with its elegant cocoa streaks, is perfect when toasted and pairs wonderfully with your morning coffee or afternoon tea. Experience the joy of homemade bread with this straightforward, plant-based recipe.
Our vegan chocolate swirl bread offers a delightful twist on classic bread making. Inspired by traditional recipes like Pan de Hojaldre, this recipe yields a soft, airy loaf with mesmerizing patterns of rich chocolate. It’s not just a treat for your taste buds, but also a feast for your eyes.
Creating this bread at home is a rewarding experience. The aroma of baking chocolate and fresh bread will fill your kitchen, promising a comforting and decadent snack. Whether you’re a seasoned baker or new to the world of yeast, our detailed instructions will guide you to a perfect loaf every time.
This recipe is entirely vegan, making it accessible for those with dietary restrictions or anyone looking to enjoy more plant-based delights. We’ve ensured that every ingredient contributes to a superior texture and flavor profile, proving that vegan baking can be just as, if not more, exquisite than its traditional counterparts.
Imagine a slice of this beautiful bread, gently toasted, with the chocolate swirls slightly warmed and fragrant. It’s a simple pleasure that elevates any moment, from a quick breakfast to a leisurely afternoon break. The subtle sweetness from the brown sugar perfectly complements the deep notes of cocoa, creating a balanced and satisfying taste.
Vegan Chocolate Swirl Bread
Print Recipe
This delightful vegan chocolate swirl bread is perfect for toasting and enjoying with your favorite tea or coffee. A truly beautiful and delicious plant-based treat!
Ingredients
For the Dough:
- 2-3 cups bread flour (adjust as needed for dough consistency)
- 2 cups whole wheat flour (adds a lovely texture and nutritional value)
- 1.5 cups warm water (for activating yeast and kneading)
- 2 tablespoons vegan butter (softened, for richness and texture)
- 1 teaspoon salt (enhances flavor)
- 2 tablespoons brown sugar (for sweetness and yeast activation)
- 2 teaspoons active dry yeast (the magic behind a fluffy loaf)
- Oil, for greasing bowls and baking tray
For the Chocolate Swirl:
- 2 tablespoons organic cocoa powder (unsweetened, for rich chocolate flavor)
- 1 tablespoon brown sugar (for the cocoa mixture)
- 1/4 cup hot water (to dissolve cocoa and sugar)
Instructions
-
Activate the Yeast: In a small bowl, warm half a cup (120ml) of water until it’s lukewarm (around 105-115°F or 40-46°C). Add 1 teaspoon of brown sugar and the active dry yeast. Mix gently and let it sit for about 10 minutes until it becomes frothy and bubbly. This indicates the yeast is active and ready.
-
Prepare the Cocoa Mixture: In a separate small bowl, mix the organic cocoa powder with 1 tablespoon of brown sugar and 1/4 cup (60ml) of hot water. Stir until the cocoa and sugar are fully dissolved and form a smooth paste. Set aside to cool to room temperature.
-
Make the Chocolate Dough: Take approximately 1/3 of the activated yeast mixture. In a mixing bowl, combine it with 1 to 1.5 cups of bread flour (start with 1 cup and add more if needed), the cooled cocoa mixture, and 1 teaspoon of vegan butter. Knead this into a soft, smooth chocolate dough. It should be pliable but not sticky.
-
Prepare the Plain Dough: In a larger greased mixing bowl, combine the remaining bread flour, whole wheat flour, and salt. Mix well. Add the remaining vegan butter, the rest of the activated yeast mixture, and the remaining water. Knead this mixture for 8-10 minutes until you have a smooth, elastic dough. If using a stand mixer, knead in 3-4 minute batches, scraping down the sides intermittently. Add more water, a tablespoon at a time, if the dough feels too dry, or a sprinkle of flour if it’s too sticky.
-
First Rise: Place both the chocolate dough and the plain dough in separate, well-greased containers. Cover them tightly with plastic wrap or a damp towel. Allow them to rise in a warm place for about 2 hours, or until they have doubled in size. This crucial step develops flavor and ensures a light, airy texture.
-
Prepare for Shaping: Once risen, gently punch down both doughs to release the air. Briefly knead each dough separately into smooth balls. Prepare your work surface by lightly dusting it with flour.
-
Roll the Doughs: Roll out the plain dough into a square of approximately 10 to 12 inches with an even thickness of about 1/4 inch. Next, roll out the chocolate dough into a square of the same dimensions, but aiming for a slightly thinner thickness, around 1/8 inch. Use additional flour on your rolling pin and surface as needed to prevent sticking.
-
Layer the Doughs: Carefully place the chocolate dough square directly on top of the plain dough square, aligning the edges as best as possible. This layering is the foundation for your beautiful swirls.
-
Fold and Re-roll: Fold the layered dough in half, then fold it in half again to create a smaller, thicker square. This step helps create distinct layers for the swirl. Gently roll out this folded dough again to approximately a 10-inch square, maintaining even thickness. This process is similar to creating flaky pastries and is key to the swirl effect.
-
Form the Roll: Starting from one side, tightly roll the square dough into a log, much like a jelly roll. Ensure it’s rolled snugly to prevent large air pockets. Once rolled, lightly moisten the open edge with water and pinch it firmly to seal the seam. Place the roll onto a greased baking tray with the sealed side facing down.
-
Score for Visual Appeal: Make deep cuts across the top of the dough roll, approximately one inch apart. These cuts will expand during baking, enhancing the swirled appearance. For a visual guide on similar shaping techniques, you can refer to tutorials for Pan de Hojaldre.
-
Second Rise: Lightly spray the top of the dough with a little oil, then cover it with a clean, damp towel. Allow the dough to rise for another 40 minutes in a warm spot. This final rise will make the bread light and fluffy.
-
Bake: Preheat your oven to 375 degrees F (190 degrees C). Bake the bread for approximately 40 minutes, or until the crust is golden brown and the internal temperature reaches around 200-210 degrees F (93-99 degrees C). The bread should sound hollow when tapped on the bottom.
-
Cool: Once baked, transfer the bread to a wire rack and allow it to cool completely before slicing. This is crucial for achieving the best texture and preventing a gummy interior. Patience is key for a perfect slice!
Notes for Success
- The total time mentioned in the recipe does not include the 2.5 hours of proving (rising) time for the doughs. Plan accordingly.
- Ensure your yeast is fresh and active for the best results. If it doesn’t foam after 10 minutes, your yeast might be expired.
- For a richer chocolate flavor, you can slightly increase the cocoa powder amount in the chocolate dough, or add a few chocolate chips before rolling.
- The nutritional value provided is based on approximately one serving. Please note that these are approximations and can vary based on ingredients used.
- Don’t be afraid to adjust flour and water amounts slightly during kneading. Dough consistency can vary based on humidity and flour type. You’re looking for a dough that is soft, pliable, and springs back when poked.
- To ensure deep, visible swirls, make sure both doughs are rolled to an even thickness and tightly rolled into a log.
- Proper cooling is essential. Slicing warm bread can compress the texture and make it seem gummy.
Nutrition
Calories: 207kcal,
Carbohydrates: 39g,
Protein: 7g,
Fat: 3g,
Sodium: 255mg,
Potassium: 150mg,
Fiber: 4g,
Sugar: 2g,
Vitamin A: 105IU,
Calcium: 16mg,
Iron: 1.3mg
Nutrition information is automatically calculated and should only be used as an approximation.
Did you make this recipe? We’d love to hear from you!
Share your baking experience and any variations you tried in the comments below!
Why Choose Vegan Chocolate Swirl Bread?
This delightful bread is more than just a sweet treat; it’s a testament to the versatility and deliciousness of vegan baking. Here’s why you should add this recipe to your repertoire:
- Rich Flavor: The combination of wholesome flours and pure cocoa powder creates a deep, satisfying flavor that isn’t overly sweet. It’s comfort food at its finest.
- Stunning Appearance: The mesmerizing chocolate swirls make this bread a showstopper. It’s perfect for brunches, potlucks, or simply impressing your family and friends.
- Healthier Indulgence: Being vegan, it’s free from dairy and eggs, offering a lighter option without compromising on taste or texture. You control the ingredients, ensuring a wholesome product.
- Versatile Enjoyment: While incredible on its own, toasted, or with tea/coffee, this bread also makes a fantastic base for sandwiches with sweet fillings like nut butter or fruit spreads.
- Rewarding Baking Experience: The process of kneading, rising, and shaping the dough is incredibly therapeutic, culminating in the joy of pulling a freshly baked loaf from the oven.
Tips for Achieving Perfect Swirls
The beauty of this bread lies in its distinct chocolate swirls. Here are some pro tips to help you master the technique:
- Even Dough Thickness: When rolling out both the plain and chocolate doughs, strive for consistent thickness. This ensures uniform layers and a more pronounced swirl effect. The chocolate dough should be slightly thinner than the plain dough.
- Tight Rolling: Roll the layered dough tightly into a log. Any looseness can lead to gaps in the swirl or a less defined pattern. A tight roll also helps the bread maintain its shape during baking.
- Gentle Handling: After the first rise, handle the dough gently to avoid deflating it too much. While you need to punch it down, avoid excessive manipulation.
- Flour Your Surface Wisely: Use just enough flour on your work surface and rolling pin to prevent sticking. Too much flour can dry out the dough, while too little will make it hard to handle.
- Visual Guidance: Don’t hesitate to watch videos of similar swirl bread or “Pan de Hojaldre” shaping if you’re a visual learner. Seeing the folding and rolling in action can be very helpful.
Serving Suggestions and Creative Variations
This vegan chocolate swirl bread is delicious in many ways. Here are a few ideas to inspire you:
- Classic Toast: Simply slice, toast lightly, and enjoy with a pat of vegan butter or your favorite jam.
- Sweet Breakfast: Serve with a drizzle of maple syrup, agave nectar, or a sprinkle of powdered sugar for an extra touch of sweetness.
- Nut Butter Delight: Spread a thin layer of almond butter, peanut butter, or cashew butter on a slice for a protein-packed snack.
- Fruit Pairing: Enjoy with fresh berries, sliced bananas, or a dollop of apple butter.
- Chocolate Chips: For an even richer chocolate experience, fold a handful of vegan chocolate chips into the chocolate dough before rolling.
- Nutty Swirl: Add finely chopped walnuts or pecans to the chocolate mixture for a textural crunch.
- Espresso Kick: Incorporate 1/2 teaspoon of espresso powder into the cocoa mixture to deepen the chocolate flavor and add a subtle coffee note.
- Cinnamon Swirl: Instead of cocoa, mix 1-2 tablespoons of cinnamon with 1 tablespoon of sugar and a teaspoon of vegan butter to create a delightful cinnamon swirl bread.
Storage Tips for Freshness
To keep your vegan chocolate swirl bread fresh and delicious for longer, follow these storage guidelines:
- Room Temperature: Once completely cooled, store the bread in an airtight container or a bread bag at room temperature for up to 3-4 days.
- Refrigeration: While not strictly necessary, if you live in a very warm climate or want to extend its freshness for a few extra days, you can store it in the refrigerator. Just be aware that refrigeration can sometimes alter the texture of bread, making it slightly drier.
- Freezing: For longer storage, slice the cooled bread and freeze the slices in a freezer-safe bag or container for up to 2-3 months. You can easily toast individual slices directly from frozen.
- Reheating: If the bread starts to feel a bit stale, a quick toast in a toaster or oven can bring it back to life, making the exterior crisp and the interior soft.
Baking this vegan chocolate swirl bread is a rewarding journey that fills your home with incredible aromas and your table with a visually stunning and delicious treat. It’s a testament to the simple joys of homemade goodness and plant-based indulgence. Enjoy every swirled bite!