
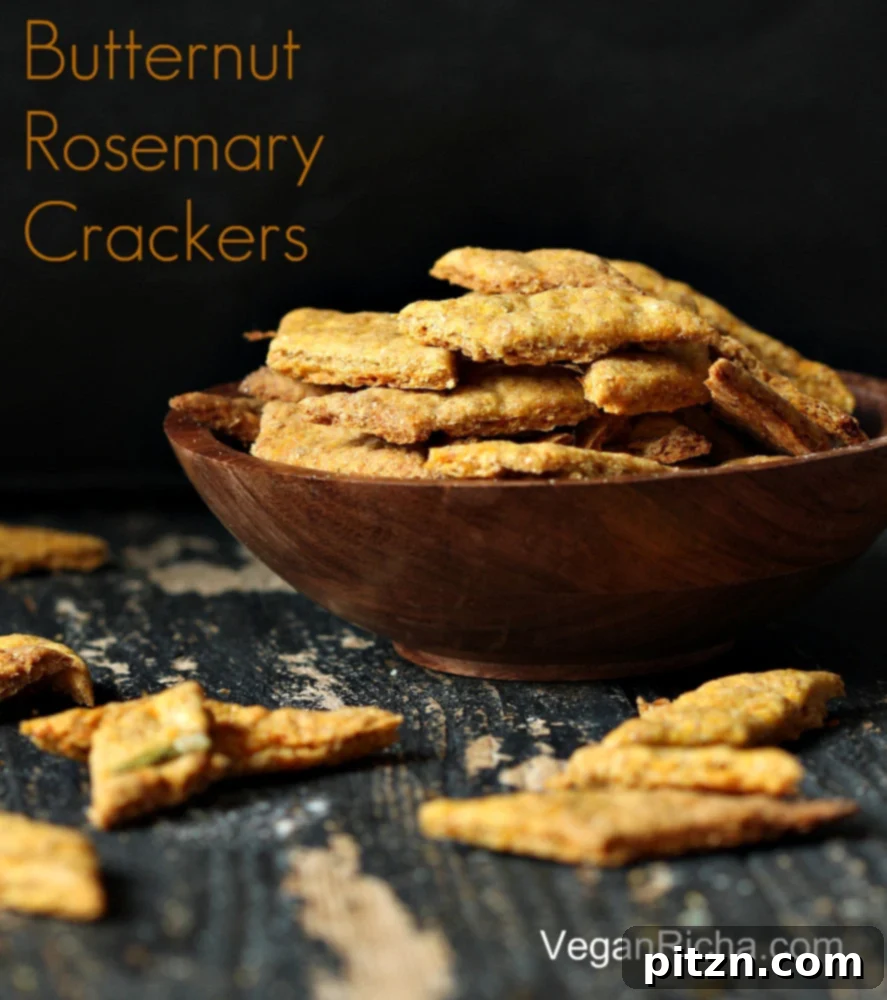
Welcome to a culinary adventure where kitchen creativity meets wholesome ingredients, leading to truly delicious and satisfying results. There’s a unique joy in crafting something extraordinary from simple beginnings, especially when those beginnings arise from a dash of curiosity or the sheer convenience of maximizing what you already have on hand. Today, we’re diving into the delightful world of homemade Butternut Squash Rosemary Onion Crackers – a recipe born from both inspiration and a desire to create something wonderful from seasonal bounty.
My kitchen journey is often paved with such happy accidents and ingenious improvisations. I vividly recall the excitement of whipping up a homemade Doritos spice mix to elevate a creamy pasta dish, a curious experiment that yielded unexpectedly fantastic results. That crave-worthy pasta is definitely on my list for a rerun! Other times, genius strikes from simply seeking the easiest path to a culinary goal. Take, for instance, the revelation of roasting an entire butternut squash – a method so straightforward yet incredibly effective. This simple act opens up a world of possibilities, from a hearty roasted butternut squash slider that became a runaway hit, to numerous other savory squash dishes.
After indulging in those delightful creations, I still found myself with a significant amount of roasted butternut squash. It was, after all, a truly generous-sized squash! Instead of letting this flavorful reserve linger, inspiration struck for these remarkable crackers. As winter crept in, my outdoor herb garden had thinned, leaving only the most resilient survivors: thyme and rosemary. Rosemary, with its earthy, pine-like aroma, paired perfectly with the sweet notes of butternut squash and the savory depth of onion. This combination promised a snack that was not only delicious but also incredibly aromatic and comforting. Thus, these vegan crackers came to be – a testament to zero-waste cooking and the magic of transforming simple ingredients into something truly special.
The beauty of homemade treats extends beyond our own plates. With the last remnants of that glorious roasted butternut mash, I decided to treat my beloved canine companion, Chewie. I created some wholesome, thicker crackers—or rather, biscuits—just for him, incorporating wheat flour, chickpea flour, and oats. And what can I say? Chewie, a truly food-motivated Pomeranian, absolutely adored them! His endearing plumpness is a testament to his love for food, though his daily diet is thoughtfully crafted. For roughly a year now, Chewie has been thriving on a completely vegan diet, a mix of high-quality vegan kibble blended with a variety of vegetables, lentils, oats, and a touch of rice. The most noticeable difference I’ve observed since his transition is that he requires a slightly larger quantity of food to feel satiated compared to his non-vegan days, but he’s happier and healthier than ever. Of course, he’s still a master of the occasional “more food, please” tantrum, which only adds to his adorable charm.
Chewie’s meal schedule generally aligns with our own. I once attempted to leave a generous box of food out for him, hoping he might self-regulate. His response was a comical stare, conveying a clear message: “Can you possibly put all of that into my bowl, right now?” He truly is a character! For an extra dose of his irresistible cuteness and insights into his vegan lifestyle, you can always catch his charming appearances on my Instagram. His happy, healthy vegan journey serves as a wonderful example of how mindful, compassionate choices can extend to our cherished animal companions, nourishing them with delicious, plant-powered goodness.
In other exciting news related to the blog and community, after what felt like an eternity of bureaucratic hoops and a fair bit of procrastination, I finally completed the paperwork to change my Facebook page name. It’s surprisingly not a self-service option! But the wait and effort were absolutely worth it. The blog’s official Facebook Page is now, at long last, Vegan Richa! You can connect with our growing community directly at https://www.facebook.com/VeganRicha. For those who remember, it was previously known as “Hobby and More,” so this new name perfectly aligns with the vibrant, plant-based culinary journey we share here. Come join us for more delicious vegan recipes, cooking insights, and inspiring food content. And if you’re looking for an extensive collection of savory crackers, healthy snacks, and other delightful treats, be sure to explore our specially curated collectionhere.
Mastering Butternut Squash Rosemary Onion Crackers: Your Guide to Crispy Perfection
Creating these savory, aromatic crackers is a surprisingly straightforward and incredibly rewarding experience. These homemade butternut squash crackers are not only bursting with flavor but also free from preservatives and artificial ingredients often found in store-bought alternatives. Follow these detailed steps to achieve perfectly crispy, golden-brown crackers every time.
Steps: Crafting Your Rosemary Butternut Crackers.
Begin by ensuring your roasted butternut squash is thoroughly mashed until it reaches a smooth, consistent puree. This creamy texture is vital for creating a pliable dough and ensuring the flavors are evenly distributed throughout your crackers.
Next, combine the mashed butternut squash with all the other measured ingredients as detailed in the recipe. Once everything is in the bowl, start to knead the mixture by hand. Knead for a dedicated few minutes until the ingredients meld together into a uniform, soft dough. It’s perfectly normal if the dough initially appears a bit dry or crumbly. As you continue to knead, the natural moisture from the butternut squash will fully incorporate into the flour, transforming the mixture into a smooth, elastic, and easily workable dough.
Once your dough has reached the ideal soft consistency, lightly dust a piece of parchment paper with whole wheat flour. Place the dough ball onto the floured parchment and, using a rolling pin, roll it out as thinly as humanly possible. The key to truly crispy crackers lies in achieving a delicate, even thinness across the entire sheet. Aim for about 1/16 to 1/8 inch thick. An evenly rolled dough ensures that all your crackers bake uniformly and achieve that satisfying crunch.
Carefully transfer the parchment paper with the rolled-out dough onto a baking sheet. Using a sharp knife or a pizza cutter, score the dough to create your desired cracker shapes – squares, rectangles, diamonds, or even irregular shards. Do not separate the individual crackers at this stage; they will break apart easily once partially baked. Lightly sprinkle a pinch of flaky sea salt over the entire surface of the dough and gently press it in with your fingertips or the flat side of your rolling pin to ensure it adheres beautifully.
Preheat your oven to 370 degrees F (188 degrees C). Bake the scored dough for approximately 15 minutes. After this initial bake, the crackers should be lightly golden, firm enough to handle, and ready for the next crucial step.
Remove the baking sheet from the oven. At this point, carefully break the crackers apart along the pre-cut lines. This separation allows air to circulate around each individual cracker, which is absolutely essential for achieving maximum crispness. Spread the separated crackers evenly across the baking sheet, ensuring none are overlapping. Reduce your oven temperature slightly to 350 degrees F (175 degrees C) and return the crackers to bake for another 7-8 minutes. Continue baking until they are uniformly golden brown and feel perfectly crisp to the touch. For optimal, even crisping, especially if your oven tends to have hot spots, it’s a good idea to rotate the baking sheet halfway through this second baking phase, perhaps even moving crackers from the center to the edges. The goal is a dry, snappy texture once cooled.
Once baked to perfection, allow the crackers to cool completely on a wire rack. This cooling process is crucial, as they will continue to crisp up as they reach room temperature. Once fully cooled, transfer your homemade Butternut Squash Rosemary Onion Crackers to an airtight container. These crackers are remarkably durable and will maintain their fresh, crispy texture for several weeks, making them an ideal make-ahead snack for entertaining or simply enjoying throughout your week. Serve them on their own, alongside your favorite vegan dips and spreads, or as a delightful crunchy accompaniment to soups and salads for a truly wholesome and flavorful experience.
Butternut Squash Rosemary Onion Crackers Recipe
Indulge in these wholesome, savory crackers, perfect for any occasion!
Allergen Information: This recipe is naturally dairy-free, egg-free, corn-free, soy-free, yeast-free, and nut-free. With a simple flour substitution, it can also be made gluten-free.
Yields: Approximately a medium bowl full, roughly 30-40 crackers depending on thickness and size.
Ingredients:
- 1/2 cup roasted butternut squash, thoroughly mashed into a smooth puree
- 1/2 cup + 2-3 Tablespoons (as needed) Whole wheat flour (for gluten-free, use an all-purpose gluten-free flour blend)
- 1/4 teaspoon baking powder
- 1 Tablespoon extra virgin olive oil
- 1/3 teaspoon fine grain salt
- 1 teaspoon onion flakes (or 1/2 teaspoon onion powder for finer texture)
- 1-2 teaspoons fresh rosemary, finely chopped (adjust to your preference for intensity)
- Black pepper to taste (approx. 1/4 teaspoon)
- Flaky sea salt for sprinkling on top
Variations & Expert Tips:
- Squash Alternatives: Don’t limit yourself to butternut! Roasted acorn squash, kabocha squash, or even sweet potato can be excellent substitutes, each offering a slightly different nuance to the flavor.
- Herb Combinations: If rosemary isn’t your favorite or isn’t available, try fresh thyme for a delicate earthiness, sage for a bolder flavor, or a blend of dried Italian herbs for a classic taste.
- Spice It Up: A pinch of garlic powder will enhance the savory notes. For a subtle warmth, add a tiny dash of smoked paprika or a hint of cayenne pepper.
- Nutritional Boost: Stir in a tablespoon of sesame seeds, flax seeds, or chia seeds into the dough for added texture, healthy fats, and fiber.
- Gluten-Free Option: To make these crackers gluten-free, simply replace the whole wheat flour with an equal amount of your favorite all-purpose gluten-free flour blend. You might need to adjust the liquid very slightly, as GF flours can absorb moisture differently.
Method:
- Prepare Squash: Begin by ensuring your roasted butternut squash is mashed extremely well. The goal is a smooth puree, free from any large lumps, which ensures a consistent dough texture.
- Combine Dry Ingredients: In a medium mixing bowl, whisk together the 1/2 cup of whole wheat flour and the baking powder.
- Form Dough: Add the mashed butternut squash, extra virgin olive oil, fine grain salt, onion flakes, finely chopped fresh rosemary, and black pepper to the flour mixture. Use your hands to thoroughly combine and begin kneading the ingredients.
- Knead and Adjust: Knead the dough for approximately 2-3 minutes. Don’t be concerned if it feels dry and crumbly at first; as you continue to knead, the natural moisture from the butternut squash will fully hydrate the flour, transforming it into a soft, pliable, and non-sticky dough. If, after 3 minutes, it still feels too sticky, gradually add the remaining 2-3 tablespoons of flour, one tablespoon at a time, until the desired soft dough consistency is achieved.
- Prepare for Rolling: Lightly flatten the dough ball with your hands. Lay a large piece of parchment paper on your clean countertop and dust it lightly with whole wheat flour to prevent sticking.
- Roll Out Dough: Place the flattened dough on the floured parchment paper. Using a rolling pin, roll the dough out as thinly as possible. The thinner you roll it, the crisper your final crackers will be. Aim for an even thickness, ideally about 1/16 to 1/8 inch.
- Cut Crackers: Carefully transfer the parchment paper with the rolled dough onto a baking sheet. Using a sharp knife or a pizza cutter, make even cuts in the dough to create your preferred cracker shapes (squares, rectangles, or diamonds are popular). Do not separate the crackers at this stage; they will be easier to handle after the first bake.
- Season: Evenly sprinkle a little flaky sea salt over the entire surface of the rolled-out, cut dough. Gently press the salt into the dough with your fingertips or the flat side of your rolling pin to ensure it adheres properly.
- First Bake: Preheat your oven to 370 degrees F (188 degrees C). Bake the crackers for an initial 15 minutes. They should be partially cooked, slightly firm, and lightly golden.
- Second Bake for Crispness: Remove the baking sheet from the oven. Carefully break the partially baked crackers apart along the cut lines. Spread them out evenly on the baking sheet, ensuring none are overlapping, to promote even air circulation. Reduce the oven temperature to 350 degrees F (175 degrees C). Return the crackers to the oven and bake for another 7-8 minutes, or until they are golden brown and perfectly crisp to the touch. For an even crisp, especially if your oven has hot spots, stir or move the crackers around on the baking sheet about halfway through this second bake, ensuring those in the center get moved to the edges.
- Cool and Store: Allow the crackers to cool completely on a wire rack. They will continue to crisp up as they cool. Once thoroughly cooled, transfer them to an airtight container. These delicious homemade crackers will remain fresh and crispy for several weeks when stored at room temperature.
Chewie’s Current Favorite Butternut Biscuits: Wholesome Homemade Dog Treats
Our furry family member, Chewie, absolutely adores these homemade, plant-based butternut biscuits. Not only are they a delicious and satisfying treat, but they also contribute to his overall health and well-being as part of his vegan diet. The beauty of making your own dog treats lies in having complete control over the ingredients, ensuring your beloved pet consumes only the finest, most natural components, free from unnecessary artificial additives or fillers often found in commercial options.
Yields: A generous large bowl full, approximately 40-50 small to medium biscuits.
Ingredients:
- 1 cup butternut puree (ensure it’s plain, roasted or steamed, with no added spices, salt, or oil for pet safety)
- 1/2 cup whole wheat flour (for a gluten-free dog option, sorghum flour works wonderfully)
- 1/3 cup rolled oats (either quick or old-fashioned oats are fine)
- 1/3 cup chickpea flour
- 2 Tablespoons flax seeds or flaxmeal (a fantastic source of omega-3 fatty acids for a healthy coat and digestion)
Method:
- Combine Ingredients: In a spacious mixing bowl, combine the butternut puree, whole wheat flour, rolled oats, chickpea flour, and flax seeds or flaxmeal.
- Knead Dough: Using your hands, begin to thoroughly knead all the ingredients together. Continue kneading until a soft, cohesive, and uniform dough forms. The dough should be firm enough to handle and roll without excessive stickiness.
- Adjust Consistency: If you find the dough to be too sticky to work with, gradually add a little more whole wheat flour, one tablespoon at a time, until it reaches the perfect consistency for rolling. Conversely, if the dough appears too dry and crumbly, add a tiny bit of water or an additional small spoonful of butternut puree.
- Roll Out: Lightly flour your clean countertop or a piece of parchment paper with whole wheat flour. Place the dough ball on the floured surface and use a rolling pin to roll it out into a rectangular shape, aiming for a thickness of approximately 1/4 inch. This thickness creates a more substantial biscuit, which dogs generally enjoy.
- Cut Biscuits: With a sharp knife or a fun dog biscuit cutter, cut the rolled-out dough into individual biscuits. Shapes like 1 to 1.5-inch diamonds, squares, or cute bone shapes are always popular.
- First Bake: Preheat your oven to 360 degrees F (180 degrees C). Arrange the cut biscuits on a baking sheet lined with parchment paper, ensuring there is a slight space between each one to allow for even baking. Bake for an initial 20 minutes.
- Second Bake for Crispness: Remove the baking sheet from the oven. If any biscuits have slightly spread or stuck together, gently break them apart. Return them to the oven and continue to bake for another 18-20 minutes, or until the biscuits are firm, dry, and crisp to the touch. The exact baking time may vary based on your oven’s calibration and the precise thickness of your biscuits; achieving a thoroughly crispy texture is important for both palatability and proper storage.
- Cool and Store: Allow the butternut biscuits to cool completely on a wire rack. This critical step ensures they fully crisp up and harden. Once they are entirely cooled, transfer them to an airtight container. Stored at room temperature, these healthy, homemade dog treats should remain fresh for several weeks, providing your beloved canine with a consistent supply of nutritious snacks.
These homemade dog treats are a truly thoughtful way to express your love for your pet, giving you complete peace of mind about what they’re consuming. Chewie, our discerning critic, unequivocally gives them two paws up!
Join the Vegan Richa Community and Share Your Creations!
We genuinely hope these recipes inspire you to unleash your culinary creativity in the kitchen! Whether you find yourself crafting a batch of savory Butternut Squash Rosemary Onion Crackers for your own enjoyment and for sharing with loved ones, or meticulously preparing wholesome Butternut Biscuits for your cherished furry companion, the unparalleled joy of homemade goodness is a feeling that truly can’t be matched. Sharing these delightful creations with both your human and animal family members is, for many of us, the most fulfilling aspect of cooking.
Don’t forget to connect with our vibrant community across social media platforms! Be sure to follow our newly renamed and official Facebook page:Vegan Richa, and for more adorable updates and charming insights into Chewie’s daily adventures, you can find him frequently gracing our Instagram feed. We absolutely love seeing your culinary adventures, hearing your feedback, and celebrating your successes in the kitchen. Please share your photos and tag us – let’s continue to build a thriving and inspiring community of plant-based food lovers together! Happy baking and happy snacking!